Review: Capture One Pro 12
This is a short review of Capture One Pro 12, Phase One’s alternative to Adobe’s Lightroom CC package.
Version 12 introduces some new features which, unlike last years update, should make this an upgrade that is much easier to recommend for most users. But is it worth the accompanying eye watering price rises?The main new features include:
- user interface updates to make the software more accessible, particularly for new users
- user interface design changes to improve usability with large or high-DPI displays
- editable vector based layer masks for local edits
- luma-range masking
Here, I will only look at the changes over the previous release of the software, using a set of colour film images that were scanned using a mirrorless camera and macro lens. For a more general overview of Capture One, please see this earlier review of the software.
User Interface Changes
Photographers coming to Capture One from other software face a steep learning curve. The approach to image editing and cataloguing is not very different – ultimately all DAM and RAW converters require much the same tasks – but Capture One’s user-interface and terminology can be a formidable barrier.
With Capture One 12, Phase One have done a good job in updating the user interface to make it both more accessible while still keeping it familiar enough that experienced users will still feel at home.
You can see the difference in the following images, showing 11 (first) and CO12 (second):
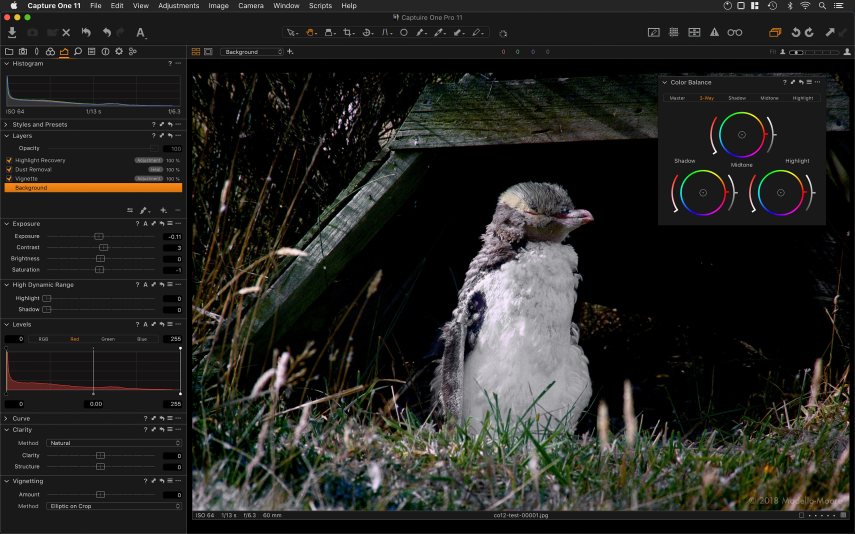
The user interface in Capture One 11.
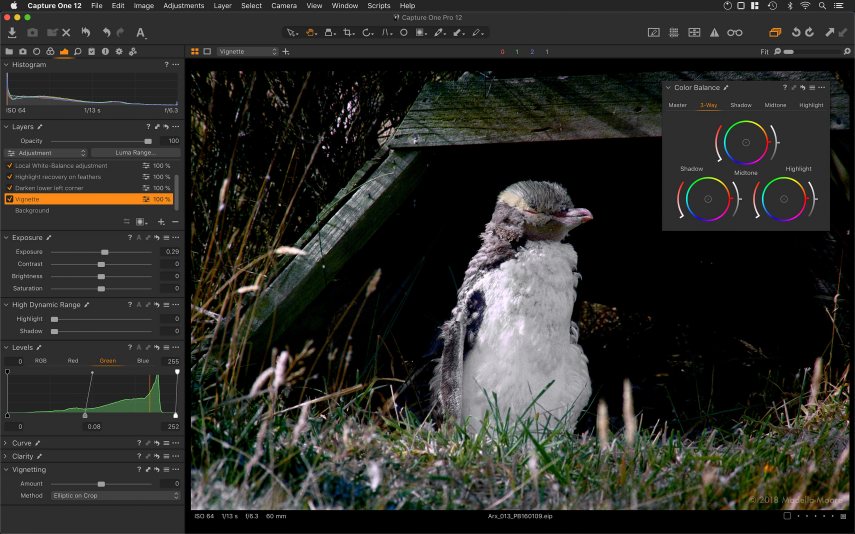
The updated user interface in Capture One 12.
The most significant change is the reorganisation of the main menu bar. Previous versions of the software had a menu structure that was, to put it politely, baroque.
The new menus are more cleanly organised around functionality, with top-level naming that follows industry conventions. This hugely improves feature discoverability for both new users and those existing users (including me!) who occasionally struggle to find rarely used commands. This is particularly true for local adjustment layers, which finally have a top-level menu all to themselves.
The graphic design for the tool panels has also been changed, using thicker outlines on icons and larger, bolder text, while the main window background is now a lighter shade of grey. Overall, I am fairly neutral about the changes to the visual design. They were likely motivated by a desire to improve usability with large, high DPI displays. But overall I prefer the older, darker style with its more visually distinctive icons (which, for example, more clearly differentiate the lens-correction and search tools).
Lastly, Phase One like to enthusiastically point out that the UI to customise keyboard shortcuts has been improved, in line with the new menu system. It is a minor change and not something you are likely to use often, but the cleaner and more searchable interface is nonetheless welcome.
New Linear and Radial Gradient Mask Tools
Capture One uses a powerful local editing system based on layers, each of which has its own layer mask to control application of the edits. But the downside to this is that any local edit needs a layer mask that must be painted by hand. While extremely flexible, generating and editing masks precisely could be very time consuming and difficult.
Capture One 12 builds on previous versions with new linear and radial gradient mask tools that work parametrically rather than by painting a bitmap. These work similarly to the tools in Adobe Lightroom, allowing the mask to be quickly and easily edited to change position, rotation and the gradient.
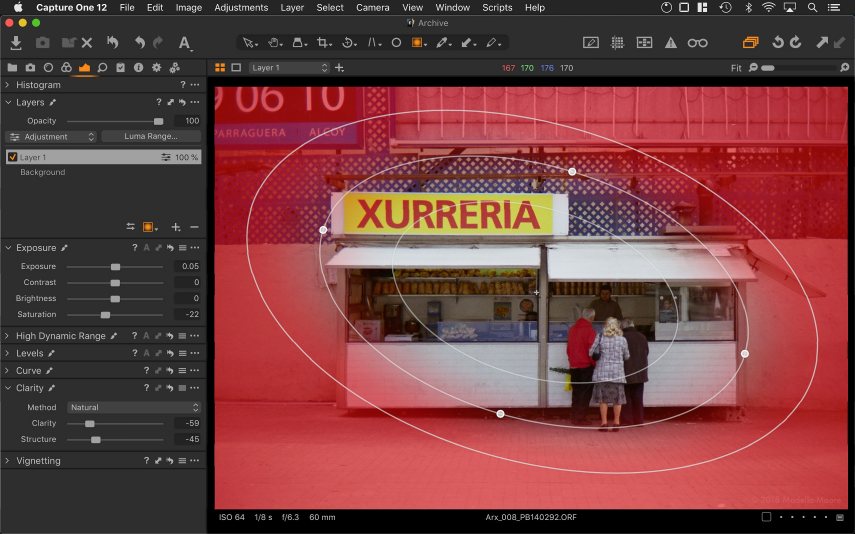
The new parametric radial mask tool in Capture One Pro 12.
If you have felt limited by Capture One’s vignetting tool in the past, you will love the new radial masks – which not only make it easy to add arbitrary levels of light fall-off, but which can also adjust any other image parameter such as sharpness, tone curves, or colour effects.

The new parametric linear mask tool in Capture One Pro 12.
Another bonus for the new mask tools is the reduction in catalogue file size. Each layer in an image creates a .comask file inside the catalogue. A brief test applying a radial mask to with a 20MP RAW file showed that the vector based version requires only a few hundred bytes of storage, while the rasterised version required a whopping 1.2MB. So if you make extensive use of local edits the new tools can significantly reduce catalogue size.
One key restriction still remains, however: Capture One’s parametric masking scheme only permits one control point set per layer. This means that a single layer can have either a single linear gradient, or a single radial gradient – and be aware that there is a hard limit of 16 layers in any given image. If you need more flexibility then you either need to use multiple layers or you need to rasterise the mask so that you can make further detailed edits using the brush tool.
The Luma Range Tool
The new “Luma Range” tool constrains a layer mask to areas of an image that have a given range of luminosity values. It is effectively a shortcut, which allows masks to be constrained by image content – potentially fine-tuning a local editing mask to the image without the need for a lot of tedious detailed brush-work.

The new Luma Range tool can be used to constrain a layer mask to areas of the image with a specified brightness.
To use the Luma Range tool first create a layer and paint on a mask, for example using the new linear or radial gradient tools. Then click the “Luma Range…” button in the layers tool to open a dialogue in which you constrain the mask to areas with a given image luminosity. There are parameters that allow control over the masking fall-off, as well as radius and sensitivity parameters that effectively provide a means of low pass filtering for the effect (this was particularly useful when testing with film scans, where the radius and sensitivity parameters can be adjusted to prevent the film grain from adversely affecting the masking).
The Luma Range tool works independently from the normally edited mask, and applies automatically to any subsequent edits made to the layer mask.
On my test system (a high-end 15″ 2018 MacBook Pro), configuring the Luma Range tool required some patience. Changing the settings often resulted in stalls of several seconds while the software analysed the image. Fortunately, once the luminosity range has been configured, subsequent use the layer runs smoothly and without any noticeable performance loss.
While this is clearly a powerful tool, I have struggled to find images where I need this level of flexibility. Perhaps the best way to regard it is as a powerful and flexible alternative to the brush tool’s “auto-mask” option, which tries to achieve a similar end albeit with significantly less control and precision.
Other new Features
Other new features in Capture One 12 include:
- A new software plug-in interface, to allow third-party processing on export of images. There is also a developer portal where you can sign up to develop plugins and download documentation and sample code.
- Expanded AppleScript support (see here for an example script to locate offline images).
- New FujiFilm film simulations (Fuji cameras only).
- Support for new cameras and lenses, including the latest full-frame mirrorless models from Canon and Nikon.
I hope to take a look at the new PlugIn interface in a separate blog post.
Conclusions
Unlike its predecessor, Capture One 12 introduces features with much broader appeal than its predecessor.
For me, the new layer mask tools make it easier to get good results quickly, and are the main reason for me to consider upgrading. During testing I found no major issues with the software and the performance was generally excellent on a mid-range 2018 MacBook Pro.
Capture One remains arguably the best direct alternative to Adobe Lightroom as an all-in-one digital asset manager and RAW developer. Its strength remains its excellent RAW engine, which gives superb results with little effort. That said, it continues to lag behind some key features from rivals – notably the lack of a “haze reduction” tool, and high-ISO noise reduction that lags behind the competition (notably DxO’s “Prime” noise algorithm). Hopefully we may see point updates to Capture One 12 to address these failings.
The one downside – and it is a big one – remains Phase One’s rapidly increasing pricing. A full perpetual single-seat licence costs €349 (inclusive of IVA), while upgrades from a previous version are a still very painful €169 – an inflation busting 10% increase over last year. For comparison, a basic annual Adobe CC subscription gives you both Lightroom and Photoshop for €145 per year, while a perpetual DxO PhotoLab 2 Elite licence costs €199 before any upgrade discount. Keep in mind that while CO12’s layer based local edits are a step up from Lightroom, they are not a replacement for the far more powerful layer-based editing tools found in Photoshop or clones such as Affinity Photo.
The good:
- the new linear and radial gradient mask tools
- luma-range masking
- clean new menu architecture
The bad:
- the new user interface graphic design could be better
The ugly:
- looking purely at results, there is nothing that CO12 does that could not already be done with CO11 (albeit perhaps with more effort)
- ever ascending prices make Capture One very poor value in comparison to rivals from Adobe or DxO, with even upgrade pricing looking excessive compared to an Adobe CC subscription
You can download a trial of Capture One Pro 12 from Phase One. Be aware that CO12 will ask to upgrade existing image catalogues to a new format that is incompatible with older versions of the software. If you are unsure about upgrading be sure to work only with copies of your files.
Lastly, below are the final film images after editing. Everything was done inside Capture One Pro 12, including the negative inversion, colour correction and extensive dust and scratch removal. The two oldest images were 20 and 35 years old respectively, and the original negatives were faded and in quite poor state.


Categories: Photography, Reviews

Thanks for your review, particularly your take on the pricing. I agree that the US$169 they want for the upgrade from 11 to 12 is not worth it, especially since I already subscribe to Adobe CC. I jumped at the upgrade from 10 to 11, but now I’ll wait for a better reason to pay that kind of money since 11 is working just fine. If they implement content aware fill, maybe I’d consider it.
Thanks! I do think that the pricing is ridiculous given the minimal changes, although there is good reason to believe that some upgrades to the RAW engine may emerge in a future 12.x point release.
I still keep an ageing standalone copy of Lightroom, which I use with older image archives. If the current CO pricing does not improve I will switch to an Adobe subscription next year – the difference in image quality is minimal, plus there is a much better DAM and the overall package is much much better value.
Great review I’ve just left lightroom for capture one and recently just switch camera systems to fuji so may just get the fujifilm only version to save money then edit my canon raws with affinity photo.