Polarising Filters for Leica M Cameras
The Leica M system is almost unique amongst modern cameras for its reliance on a viewfinder that is works alongside rather than through the main lens. In some cases, this is an advantage as neither the viewfinder nor focusing mechanisms are affected by a filter on the lens – great for colour-contrast and neutral density filters, for example.
But the flip-side to this is that it becomes very difficult to use filters that need to be adjusted based on what the camera sees through its main lens. This is a problem if you shoot film or if you use a camera without live-view.

Street art, Santander. Shot with a polarising filter to reduce surface glare and boost saturation.
Why Use a Polarising Filter?
A polarising filter, as the name suggests, filters the light entering the camera so as to select light with a specific polarisation. Light (in classical Physics) is a wave with orthogonal electric and magnetic components that have have a characteristic orientation in space. A polarising filter can selectively attenuate light with a given orientation, by rotating the filter so that it is aligned with the light to be passed.
This matters in photography because of two effects. The first is a scattering process of light in the atmosphere that leads to a preferential polarisation of light that is strongest angled away from the sun. A polarising filter can darken and saturate a blue sky, helping to balance overall brightness in a scene and to give greater contrast with any clouds that are present. It also works well in combination with a dark red filter used for black-and-white photography, where it is possible to render a sky almost completely black.

Seascape minimalism. Shot using a polarising filter to reduce reflections from the water and to increase saturation in the sky.
The second source of polarised light comes from strong reflections, usually from water, glass or polished surfaces. A polarising filter can darken large areas of water and make it possible to see beneath the surface, or it can reduce reflections when shooting through sheets of glass such as windows – and in doing so it can saturate and deepen colours to give a photo more “pop”. The effects can be particularly dramatic with wet foliage in bright sun after a summer storm, or with plants or fish in a river.

Ranunculus river plants, Salamanca. A polarising filter was used to reduce reflections from the water surface. Olympus OM-D E-M1 with 25mm f1.4 (because the M 262 was not available thanks to a six week repair in Wezlar…)
Lastly, it should be noted that there are two types of polarising filter commonly available, that differ in the polarisation characteristic that they select: linear polarisers and circular polarisers. Most quality filters on the market today are the latter type, as linear polarisers can cause problems with phase-detection auto-focus systems. For, manual-focus cameras, such as the Leica, either polariser type can be used equally well.
Can digital post-processing avoid the need for Polarising filters?
It is possible to simulate some polarising effects in Lightroom or Capture One, using the saturation controls and selective colour adjustments.
The following mountain scene was shot first with a polarising filter, and then without. The latter was then post-processed in Capture One to try to replicate the polarisation effect.
The post-processed image effectively produces the same result, and required just two simple changes: (i) to darken the blue sky, and (ii) to lighten and increase saturation for the green foliage. Both edits are quick and easy using the “advanced” panel in Capture One’s colour editor.
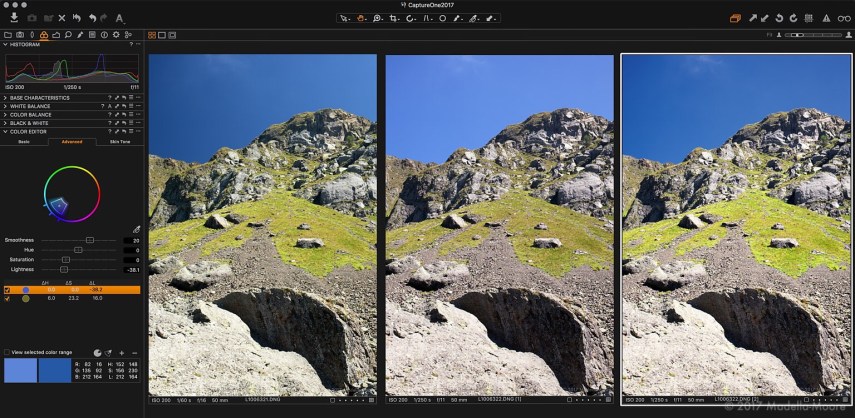
Replicating polariser colour effects using Capture One’s colour editor. Left to right are: the polarised image, the unpolarised image, and lastly the unpolarised image edited to match.


In the example above, it is arguable that the post-processed result is actually better than the version taken with the real filter because the sky is more uniform. This is because the degree of polarisation of light from the sky varies with distance from the sun – here just out of frame on the right side of the photograph.
However, when there are reflections in an image it is not possible to trivially replicate the polarisation effect digitally. The following shows a beach scene shot both polarised and unpolarised:

Polarised (top) and unpolarised (bottom) versions of a beach scene. It is not possible to trivially emulate the effect of the polarising filter digitally.


The unpolarised version has significant reflection from the surface of the water that changes the look considerably. So while not every image needs a polarising filter, for some shots there is no substitute to getting it right in-camera.
Using a Standard Polarising Filter with Leica M
A conventional polarising filter simply screws in to the front of the lens, and once attached it can be rotated to adjust the polarisation angle.
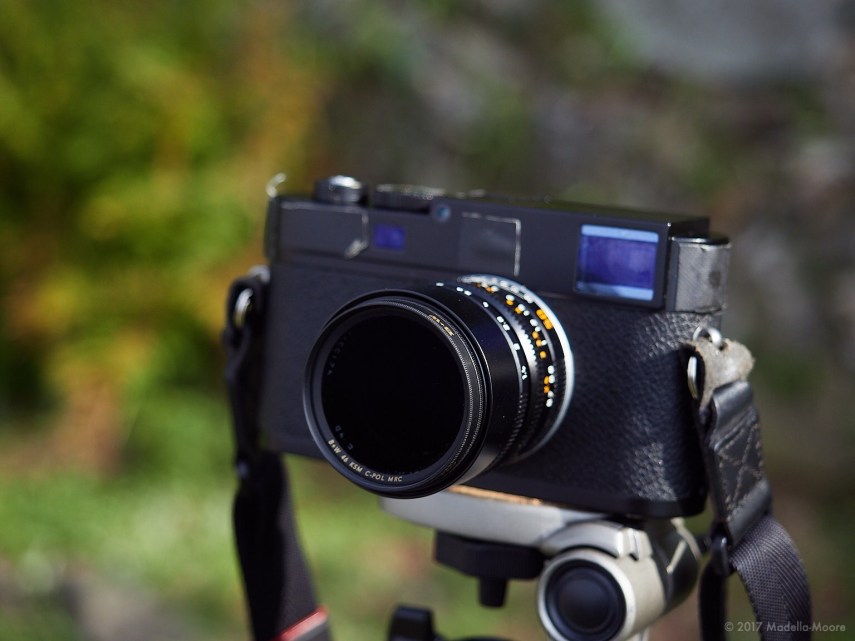
Summilux 50mm fitted with a 46mm polarising filter.
With most through-the-lens DSLRs and mirrorless cameras you can see the polarisation effect directly. But with the Leica the view through the rangefinder does not show the polarisation, making it impossible to directly see the polarisation effect and adjust the filter angle accordingly.
Fortunately, there are a couple of indirect strategies that can be used:
- Using a built-in light-meter to find the angle at which the exposure is longest (ie the most light is attenuated)
- Using a second polarising filter (not mounted on the lens, so that you can look through it) to determine the angle, and then adjusting the filter on the lens to match
The big advantage of this technique is that the filters are small, easily carried and cause minimal finder blockage.
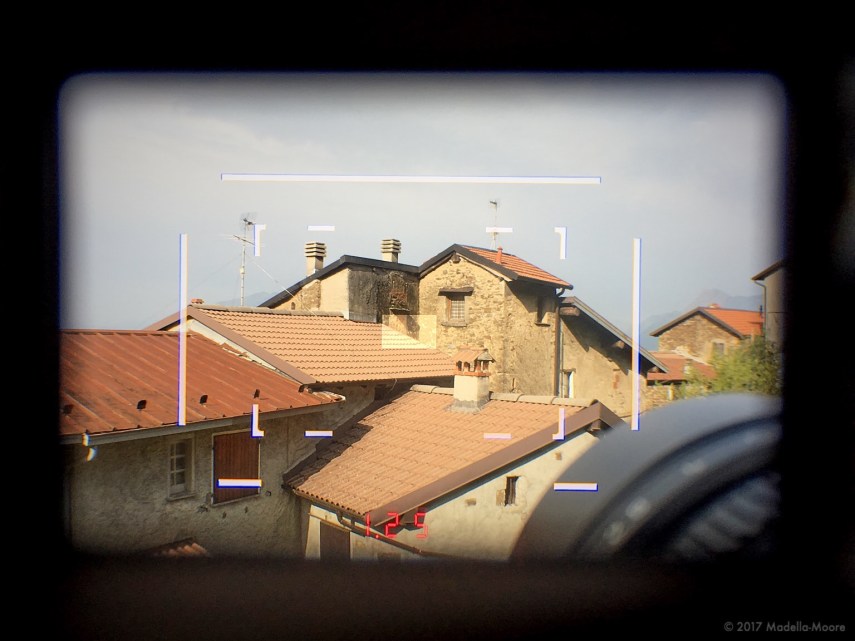
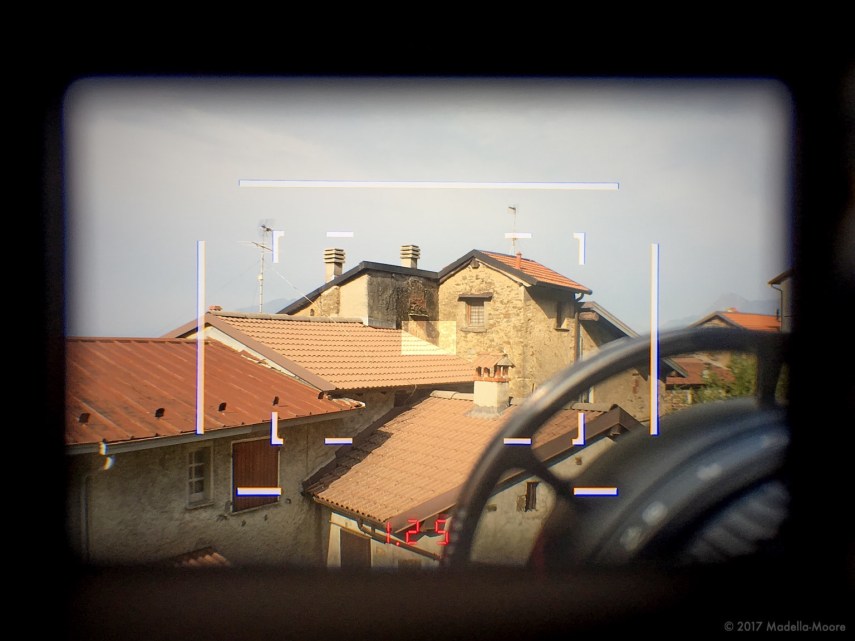
Viewfinder blockage on an M typ 262 using s Summilux 50mm focussed near infinity and with a conventional 46mm polarising filter fitted. The lens hood is retracted, but is wide enough that even with the filter fitted there is no additional blockage.
If your camera has a usable live-view implementation, this is by far the best option. However, without live-view it is difficult to set the filter angle precisely (quite why Leica makes current digital cameras with an LCD is another issue entirely…).
Using a Vented Step-up Ring with an Oversized Polarising Filter
Step up rings can used to mount a larger filter on to a smaller lens, and a vented step-up ring makes it possible to see through part of the filter to check the polarisation angle is set correctly.
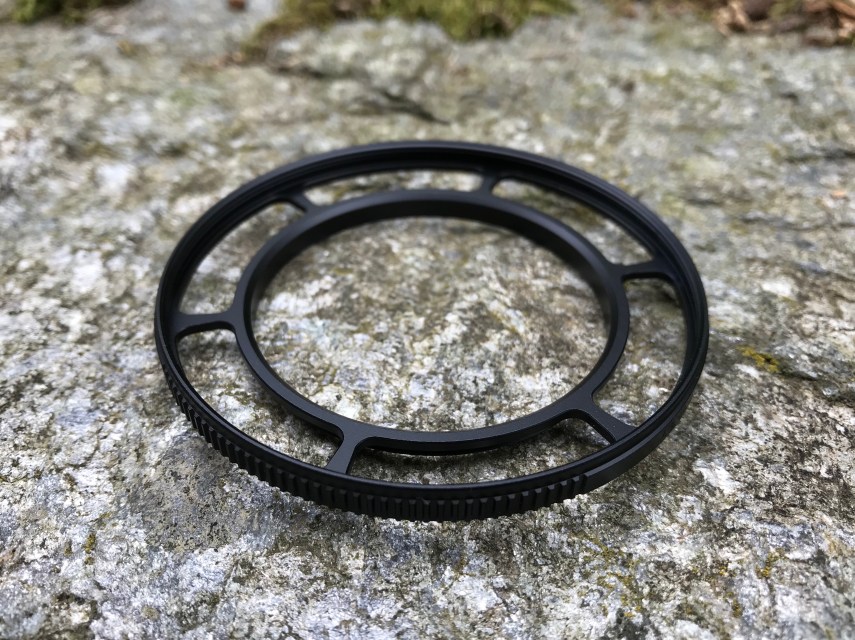
A Leica Polarising adapter – basically a 49mm to 67mm step-up ring with holes…
This particular step-up ring (“Part no 14286”) is intended to be used with the 28/35/50mm Tri-Elmar-M, although it can mount on anything with an E49 filter thread. I bought it primarily to use with a Zeiss ZM 1,4/35 but it can also be mounted on smaller lenses by using a conventional 46 to 49mm step-up ring. Here it is shown fitted to a 50mm Summilux:

Summilux 50mm with 67mm polarising filter fitted via a vented step-up ring.
Looking through the viewfinder, you can see some parts of the image through the vents, allowing the polarisation angle to be set. Also, because of the vents, there is surprisingly little finder blockage:
Viewfinder blockage on an M typ 262 using a Summilux 50mm with 67mm polarising filter fitted via a vented step-up ring. You can see part of the image through the vents, making it easy to adjust the polarisation angle.
The filter is very convenient and accurate in use. But with some lenses – including the Zeiss – it is possible to pick up unwanted reflections of objects from behind the lens.
Light skinned fingers will happily reflect sunlight through the vented openings, and some of this light then gets reflected off the back of the polarising filter in to the image. The problem is worse if you need a step-up ring, which pushes the filter further away from the front of the lens, or when using wider-angle lenses.
The following is an extreme example, taken with a 21mm lens shot in to the sun. You can see both pink reflections from my fingers and also reflections from the lettering on the front of the lens:

Unwanted reflections caused by stray light entering the back of the filter via the open vents.
The problems are caused by any bright light that enters from behind the lens – in this case the sun reflected from my hands. Of course, I probably should not have shot in to the sun like this, but constantly screwing and unscrewing the filter between shots is tedious at best and usually impractical. Perhaps a different polarising filter would help, although the above shot was taken with an excellent multi-coated filter from B+W.
The vented polariser has the advantage of being relatively cheap, small and light. I use it occasionally and cautiously with the Zeiss 35mm lens and a digital camera where I can quickly check that there are no back-reflections. However, I find it too unreliable for regular or film use.
The Leica Universal Polariser
The last and possibly best overall option is the Leica Universal Polariser. This Heath Robinson-like contraption mounts the polarising filter on a hinge, so that the polariser can be flipped away from the lens to allow you to see through it and adjust the polarisation angle.
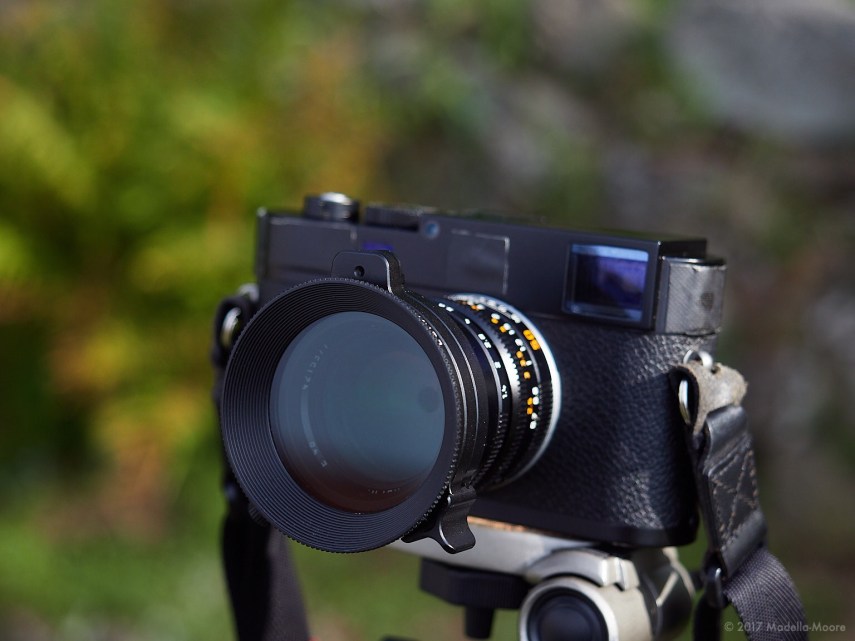
The Leica Universal Polariser with the filter locked in place in front of the lens. Although bulky, the front surround doubles as a shallow lens hood to help reduce glare (or, more usefully in my case, to reduce the chance of accidental fingerprints on the filter…).
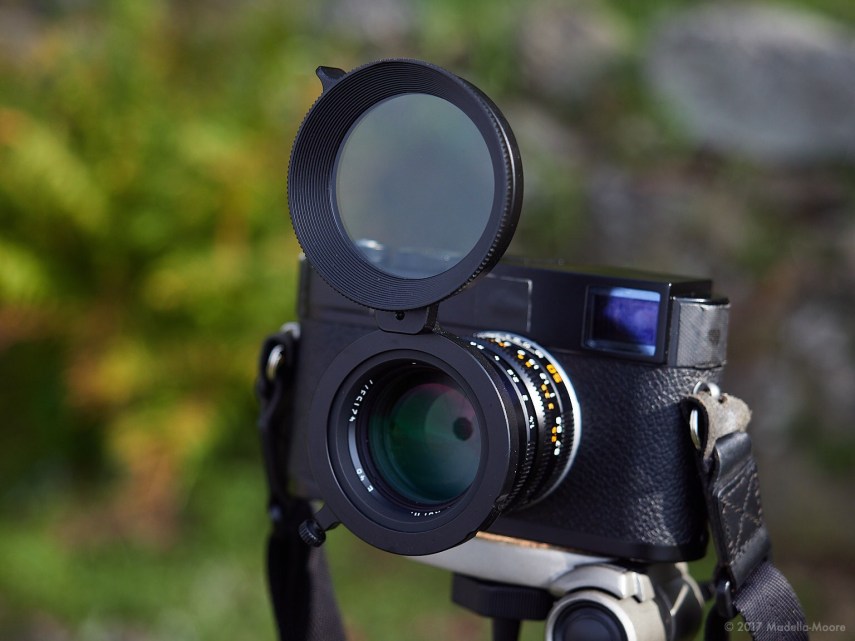
The Leica Universal Polariser, with the filter flipped away from the lens. This allows you to look through the filter to set the polarisation angle, before flipping the filter back in front of the lens to take the picture.
This has several advantages. Firstly, and most importantly, it is extremely accurate. Secondly, there is no danger of unexpected reflections from the back of the filter ruining the image. And lastly, you can take photographs without the filter simply by flipping it out of the way.
Of course, there are downsides. The filter is expensive, bulky and makes the camera front heavy. It is slower to use and less convenient than the vented-step-up ring, and there is also considerable finder blockage:

Viewfinder blockage on an M typ 262 using a Summilux 50mm with a Leica Universal Polariser fitted. Shown here, this is slightly worse than it could have been because I should have mounted the filter so that the screw/hinge on the right was outside of the frame lines…
The Leica filter is of excellent quality, with minimal colour-cast. Like most other filters it can be susceptible to flare when shot in to a bright light source:

Flare caused by shooting in to the sun. This is could (mostly) have been avoided if I had thought to simply flip the filter away from the lens…
However, unlike the other techniques, it is trivial to flip the filter away from the lens to avoid the problem completely (although this does assume a somewhat less careless photographer than I am).
The Leica Universal Polariser is only made in one size, fitting 39mm, 46mm and 49mm threads via adapter rings, so the “universal” claim is a little inaccurate given that you can not use this filter with larger lenses such as the Noctilux. Alternatives for larger lenses might be found with similarly design filters for older medium format rangefinder cameras such as those from Mamiya or Bronica.
The filter comes with an amply padded transport case that is larger than some lens cases, let alone a case for a single filter. However, it also has pockets to hold the lens adapter rings and a few other filters. I use the pockets to carry a small selection of ND and colour contrast filters as needed.
Conclusion
Using Polarising filters on Leica M series cameras without live-view is never going to be easy.
With the M7 and black-and-white film, I mainly use a polariser in parallel with a deep red filter to darken skies. For that I am happy to use a simple filter, adjusting it by judging the darkest meter reading on an area of sky.
But for anything more precise, the most reliable and accurate option is the Leica Universal Polariser.

Shot through a glass window, using a polarising filter to avoid reflections.
Categories: Equipment, Photography, Reviews, Technique

Interesting article, full of hints and lovely photos too. The trouble is: I like flare!! Pefection is perfect imo when it fails!
Yes, flare can turn an ordinary picture in to something amazing!
would you recommend using a circular polarizer on mp using in camera light meter? or would it be too hard?