Review: Capture One 10

Phase One has just announced the latest update to their flagship RAW processing software, Capture One 10, with a raft of new features and improvements – and a €99 price tag for the update. Is it worth upgrading?
Capture One is a RAW developer that was originally designed primarily to support Phase One’s digital medium format backs, but which is today a much more capable package that supports numerous camera types and which now rivals heavyweight software such as Adobe’s Lightroom. I have been using Capture One since version 7, and I migrated away from Adobe completely when version 8 was released – you can read a detailed review of that experience here. This review looks at the features available in Capture One Pro 10 – be aware that not all of these may be available with different licence versions.
The new feature list for Capture One Pro 10 (hereafter CO10) includes:
- improved application responsiveness when editing
- new sharpening tools and workflow
- improved JPEG output quality at higher compression levels
- the ability to colour-proof the currently selected output recipe
- auto-masking (Brush tool) now works on any image format (useful for Fuji Xtrans users in particular)
- new camera support, including the Olympus E-M1 Mark II (including HiRes support)
There are also numerous other improvements, although many of these are for very specific uses and/or hardware:
- Tangent Wave control surface integration
- support for Canon and Nikon compressed RAW file formats
- the ability to move folders of images in a catalogue from within the Catalog Tool
- an option to reduce in stripe image artefacts with extreme lens shifts (IQ1 100 and IQ3 100 digital backs only)
- focus peaking for static images and tethering (Canon, Sony and Phase One cameras only)
- search/filter based on image orientation (landscape/portrait)
- changes to the licensing system to better support corporate installations
It is good to see Phase One getting ahead of the curve with support for new cameras. While I can not yet post images from the E-M1 mark II (the camera is still not available here), some simple tests using RAW files downloaded from dpreview suggest that Capture One 10 gives results that comfortably exceed those from Olympus Viewer and the current betas of Adobe RAW.
Performance Improvements
In use, the most obvious improvement is in panning zoomed images, where the UI is now smooth and not jerky. Local edits are also noticeably faster, making precise brush-work significantly easier. Meta data handling is improved too, with fewer UI stalls when performing keyword additions and removals across many images.
Despite these improvements, Phase One still has some work to do to catch up with Lightroom’s performance for basic editing functions, such as exposure and contrast – which on my machine are still laggy when compared to Adobe on the same hardware.
OpenCL is now enabled by default, and any performance gains will depend heavily on the GPU performance on your machine. On my 2013 MacBookPro I get better performance by disabling OpenCL in the preferences when the System Preference Display Scaling is set for “more space”.
Tangent Wave
Tangent Wave integration is, judging from the publicity photographs, the headline new feature for CO10. It allows a dedicated hardware control panel or Android/iOS application to act as a dedicated controller for Capture One editing functions.
There is a free version of the iOS application available, which can be used to test out the system:

Installation is slightly awkward, in that you will need to install the Tangent Mapper application on the same computer that you are using for Capture One, and then pair the iOS/Android application to this. Fortunately, there are clear instructions on Tangent’s web site (click here to download a PDF manual), and Capture One “just works” once the Tangent software is setup.
The iOS application emulates the physical controllers and, in the example display above, the three red circles shown are emulation of physical track-balls which are by default mapped to the three colour-balance controls in Capture One.

Dragging the ball adjusts the colour and saturation, while dragging around the surrounding grey ring will adjust the brightness. The buttons above each ball provide additional conveniences, such as briefly disabling the settings to allow comparison, and reseting the edit back to the default.
Tapping on the lower left of the iPad screen switches between several different hardware controller emulations, and these are all mapped to the main editing controls in Capture One. A box above the controls shows how things are mapped, and is highlighted as you made edits, and it is extremely quick and easy to make the most common and important image edits entirely from the iPad.
The adjustments were not super-smooth in my testing, particularly when compared to edits made via an attached Wacom tablet. This is likely due to a somewhat laggy WiFi connection, and I would expect results with a dedicated hardware controller to be much better. Incidentally, one way to improve this would be to enabled wired communication between the iPad and the Mac via the charging cable. Having previously written software to do this, I would expect substantially better latency and reliability.
While I have not yet tried Tangent’s physical controllers, it is easy to see that they would provide a huge step-up in usability compared to a conventional mouse trackpad or graphics tablet. Unfortunately, the hardware version of the above iPad screen retails for 950€, and the complete hardware controller setup would cost 2750€. You need to be doing a lot of editing to justify both the cost of these controllers and the time needed to become expert in their use.
New Sharpening Tools
The most significant new image quality and editing function in CO10 is the new sharpening model.
This breaks image sharpening in to three distinct phases:
- input sharpening, which is a simple on/off check-box that applies compensation for diffraction softening
- creative sharpening, which is what you get to play with when editing the image
- output sharpening, which is applied when processing final output images, with specialised support for both screen and print destinations
-

- Input Sharpening (Diffraction Correction)
-
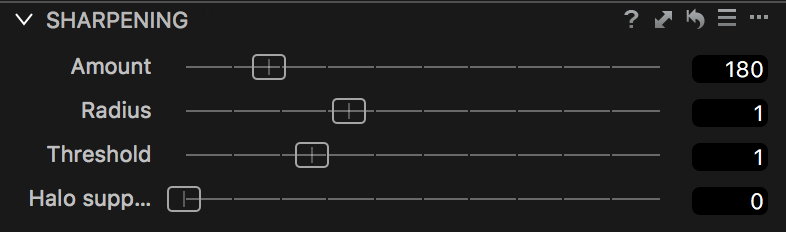
- Creative Sharpening Controls
-
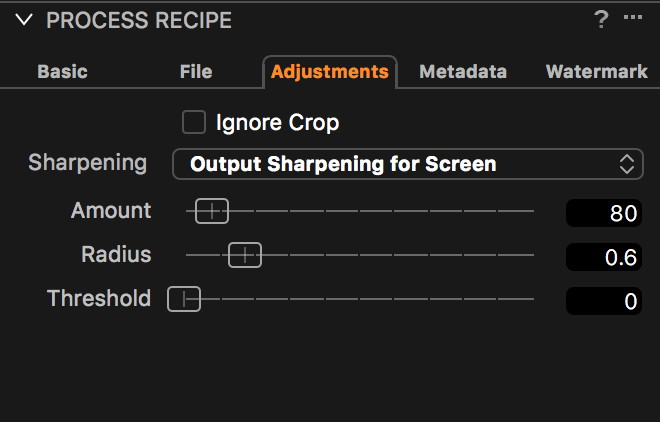
- Output Sharpening Controls
The new diffraction correction setting and the addition of a halo suppression control for the creative sharpening are worth exploring in more detail.
Diffraction Correction
The diffraction correction uses the lens aperture data to perform deconvolution sharpening on the image data prior to subsequent modifications. Since the software knows the likely form and size of the Airy Disk, this specific sharpening stage can potentially out-perform manual sharpening corrections.
As a test, I shot a series of macro images using an Olympus E-M10II and 60mm f2.8 macro lens at varying apertures with our no-expense-spared model for the day, Robin:

This is a micro 4/3 system, so the lens is optimal at roughly f4 and suffers progressively from diffraction softening as it is further stopped down. Macro photography in particular is often a balance between obtaining sufficient depth of field while avoiding excessive image softening. One way to solve this is to use techniques such as focus stacking, and this is supported in Capture One via integration with the specialist third party application, Helicon Focus. However, in many cases, such as in nature photography where subjects move, stacking is not possible – and anything which can improve diffraction limited image quality is useful.
The following show extreme (400%) crops of centre of Robin’s belt (chosen as the focus point for this test). Each image shows the correction disabled (left) and enabled (right), with each image pair taken at f4, f8, f11 and f16:

Diffraction Correction comparison at f4

Diffraction Correction comparison at f8

Diffraction Correction comparison at f11

Diffraction Correction comparison at f16
The effect is subtle, clearly dependent on the aperture, and there are no undesirable artefacts as a side-effect of the correction. I estimate that enabling the correction is roughly equivalent to shooting at an aperture one stop wider, which is a very useful result.
It is particularly effective when used with Olympus’ HiRes (pixel-shift) RAW files, which are in practise almost always diffraction limited. Here is an example showing a crop from one of Imaging Resource‘s sample HiRes ORF files for the E-M1 mark II (left side with default rendering, right with diffraction correction enabled):

It is worth adding that an essentially equivalent result can be achieved by simply dialling in a small amount of extra sharpening and “structure” (via the Clarity tool). However, the Diffraction Correction option does this automatically and is much more convenient – and there is seemingly no downside to just leaving it enabled.
The new Halo Suppression Sharpening Control
One of the downsides to sharpening is that it can lead to strange “halo” effects around sharp edges. Capture One 10 has a new tool to counter this, and it works extremely well.
Here is another example, this time taken from a photograph of a playing card that was deliberately shot at a narrow (f16) aperture with the aim of trying to use the sharpening tools to recover the image:

In the following examples:
- top-left: the image taken at a non-diffraction limited aperture (f5.6)
- top-right: the image taken at f16
- lower-left: the image at f16 with diffraction correction, strong sharpening and some structure
- lower-right: the image at f16 with diffraction correction, strong sharpening and some structure and halo-suppression


You can clearly see the halos that were created by the high-level of sharpening that was used. Depending on the colours and contrast, these can appear dark or light and the new halo suppression tool has done an excellent job at removing them.
Lastly, a quick comparison with Lightroom 6.7, using the fully-sharpened and corrected image:


Lightroom’s sharpening is generally less prone to creating halo artefacts than Capture One, so it could be argued that it does not need a halo suppression slider. However, I prefer the Capture One result, and in particular it was difficult to use the “masking” slider in Lightroom without introducing some pretty horrible false texture in the red heart.
That said, keep in mind that the images above are being displayed at 400% magnification and use a fairly extreme level of sharpening. How much you benefit from these new features will depend a lot on the kinds of images you need to process.
Output Proofing
Colour proofing allows you to check the rendering of an image on a given output medium. Most printers have a much restricted dynamic range and gamut compared to a good computer display, and an image that looks good on screen may look not so great when printed. Colour proofing allows you to similate the effects of a given output medium on-screen.
Traditionally, Capture One has provided colour proofing via selection of an ICC profile on the view menu. ICC profiles describe the colour capabilities of a particular output medium, such as an external monitor or printer with a specific set of inks and paper. There are several good third party hardware tools that allow you to profile screen, projector and printer output, and many good third party print services provide downloadable profiles that allow you to check the likely results before ordering an expensive print.
CO10 goes one step further than older versions of the software, adding a one-click option that causes the software to display an emulation of the complete output process recipe (the description of how a processed image will be rendered). This includes not just the colour profile, but all of the output settings including image size and JPEG compression. The following shows an image in the editor both normally, and with proofing enabled for a deliberately crippled JPEG output recipe:
")
")
Lastly, the under/over-exposure warning indicator understands the selected colour profile, so that clicking on “show exposure warnings” (triangular icon in the toolbar) will toggle a colour overlay that shows which areas of the image contain colours that can not be rendered for the current recipe/ICC profile.
Improved JPEG output at high compression?
Well, yes, it is a bit improved. But the difference is pretty marginal even at the most extreme compression settings – and the files are fractionally larger too.


As an aside, the new output proofing tool makes it very easy to see how the the JPEG compression level degrades image quality with a given compression level.
Conclusion
The Good:
- excellent Tangent Wave integration
- useful improvements to the sharpening workflow and image quality
- useful speed improvements
- Canon and Nikon users finally get compressed RAW support
The Bad:
- still no updates to fix the painful limitations with the cloning and healing layer tools, which are woefully limited in comparison to Lightroom
- many of the best new features are only useful to a small users with very specific camera and computer setups
- Very slow DAM performance with catalogues containing more than a few thousand images
The Ugly:
- many people will struggle to find anything sufficiently better to justify the €99 upgrade fee
For new users, Capture One remains an excellent alternative to Adobe Lightroom or DXO Optics Pro, and the latest version continues to improve performance, functionality and image quality. Unfortunately, many existing users will struggle to find compelling reasons to upgrade.
The Tangent Wave integration combined with the performance gains are excellent – but you will need a fast GPU and expensive external controller hardware to make good use of them. From a pure image quality perspective, the new diffraction compensation and sharpening tools are a useful (albeit small) step forward from older versions of the software. Similarly, the improved JPEG output at high-compression levels is nice, but hardly an earth-shattering improvement. The reality is that Capture One’s RAW processing was already astonishingly good, and there is likely little scope for Phase One’s engineers to improve it.
If you shoot a lot of tethered work, CO10 also has some useful new focusing aids. However, I have not reviewed these as the most valuable new feature – focus peaking on live-view – is not supported on any camera we use. Capture One’s tethering support is extremely well implemented, providing extensive camera controls from inside of the application. Unfortunately, with Canon, it is badly limited by the quality of (Canon’s) USB live-view streaming, and this is probably why focus peaking is not possible (see this screenshot for an example live-view capture using the 5D mark III).
I think that there are some glaring improvements that could have been made and which are not included in this update. For example, it would nice to see an improved noise reduction tool, as the current algorithm is prone to creating desaturation artefacts at high settings and is comfortably outperformed by DXO Prime. It would also be extremely useful to see an update to the crude cloning/healing layer tools, which fundamentally have not changed in several years and which are completely outclassed by Lightroom’s equivalent functionality. Either of these would have greatly increased the value of the upgrade, particularly for users that are not shooting with Phase One cameras.
A trial version of the software can be downloaded from Phase One and can be run alongside an existing Capture One install. Be aware that opening an existing catalogue in CO10 will cause the catalog format to be upgraded, rendering it incompatible with older versions of the software.
Categories: Photography, Reviews

You are very lenient.This version is more an update than an upgrade, excepted for Tangent intégration. Currently I use CO9, I also tested and compared thé results got with CO10, the improvements are tiny and do not justify thé transition towards CO10, excepted if you want integrate Tangent.
Well, I did note under “the ugly” that many people will find it difficult to justify the upgrade cost – so I do not disagree that the improvements for most people are small.
I think that Phase One are fundamentally confused as to whether CO is primarily software to support their medium format cameras, or whether it is intended to complete with Adobe for more general use. This version seems to have concentrated all of the engineering resource on making the Tangent Wave system work, which is probably irrelevant to 99% of their user-base. Right now, the functional and performance comparison to Lightroom is quite poor, as Adobe has continued to add useful features (such as de-haze), while Phase One has made only minor tweaks to their RAW engine.
Some of this is pretty inexcusable. For example, why is the vignetting adjustment tool so crude in comparison to Lightroom? The parameters that Lightroom allow you to adjust obviously must exist in the CO implementation, but for some inexplicable reason only the intensity can be changed. Similar criticism can be made for the DAM functionality too.
Hopefully, Capture One will address the growing gap between it and its competitors with point releases. If not, the competing software will look increasingly attractive and a lot of CO users will jump ship.