DxO PhotoLab 9
Yesterday, DxO PhotoLab 9 was released. Here are some very preliminary thoughts on the new version.
AI Masking

DxO has been slow to the AI masking party, and most rivals now have a two year head start. But waiting until the technology was mature may have been a wise strategy.
While AI masks at first may seem almost magical, results with real-world images are frequently imperfect and need substantial work to correct. When comparing tools a year ago, I found it easier to get clean results with PhotoLab’s U-Point masks than with any of the AUI systems that I tried.
Regardless, all of the old PhotoLab masking tools remain and benefit from the upgraded mask layering. AI is just another option in the toolbox rather than a requirement, and much of the learning curve will be about understanding which tool is better for which problem.
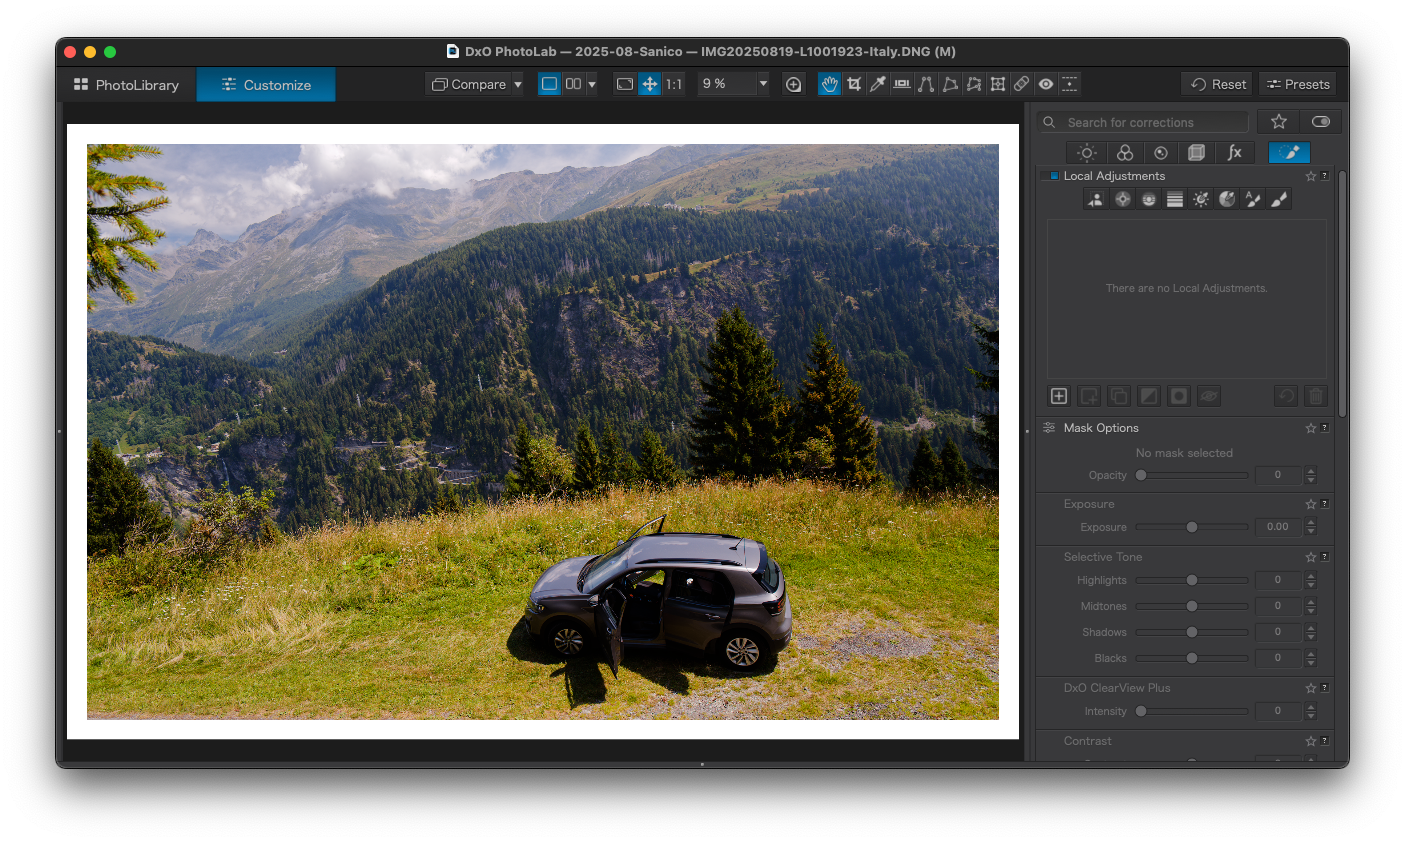
AI Masking Example 1
In use, PhotoLab’s AI masking in use feels much like other software, which is no bad thing.
Select the tool, wave the cursor over the image, and watch as the AI highlights areas. Click to create a new mask, shift-click to add to an existing mask, and alt-click to remove. Quick and simple.
In this example, the car was selected with a single click, and then its exposure lifted:


Quite easy and the result is excellent. Here is another example, to darken the grass surrounding the car slightly:


Excellent.
AI Masking Example 2
Here I have a landscape image which needs the sky to be darkened.
I used the cursor to select the sky area, but there is also a pop-up menu to detect sky automatically, in case you are unsure where it is.
The following show the result of moving the cursor to different positions over the sky area:


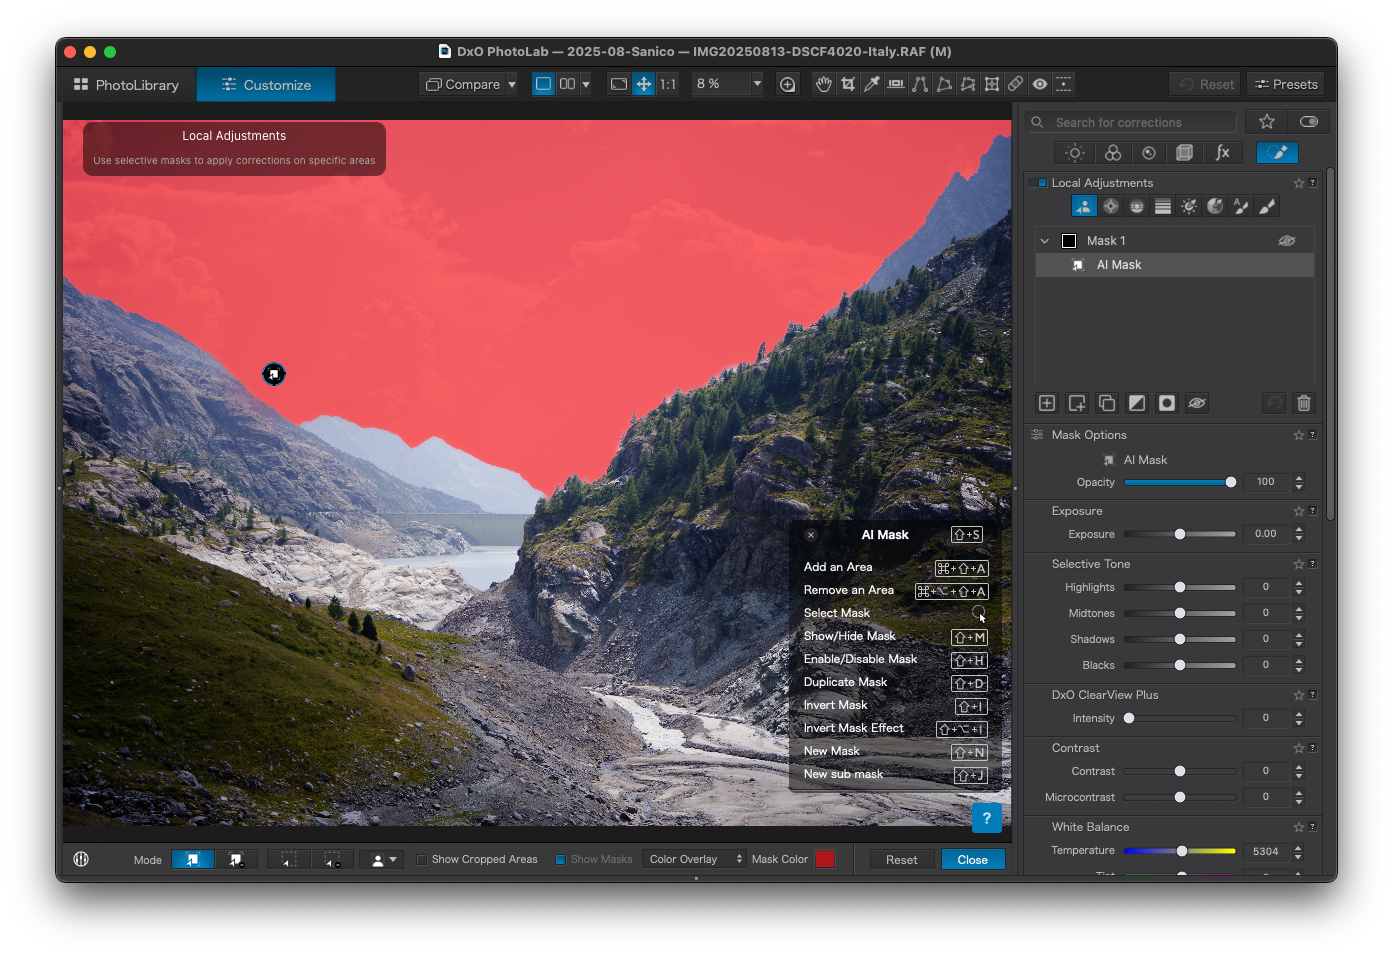
There is no configuration here. The software automatically tries to switch between different kinds of selection object, and there are no explicit modes such as ‘sky’ or ‘face’ for the detection algorithm.
The mask selection algorithm often shows a regular grid-like pattern. This is presumably an algorithmic artefact rather than anything from the image data itself, and can only be resolved by trial and error with the cursor position or by repeatedly adding to the mask with Shift-click.
Sometimes the selections can be strange. This shows an attempt to remove a single cloud from the above mask:

This clearly shows algorithmic defects in the form of the square blocks that have been removed but which seemingly have no relationship to the target cloud. Again, you can patch that up – but it is not as smooth or reliable as other software.
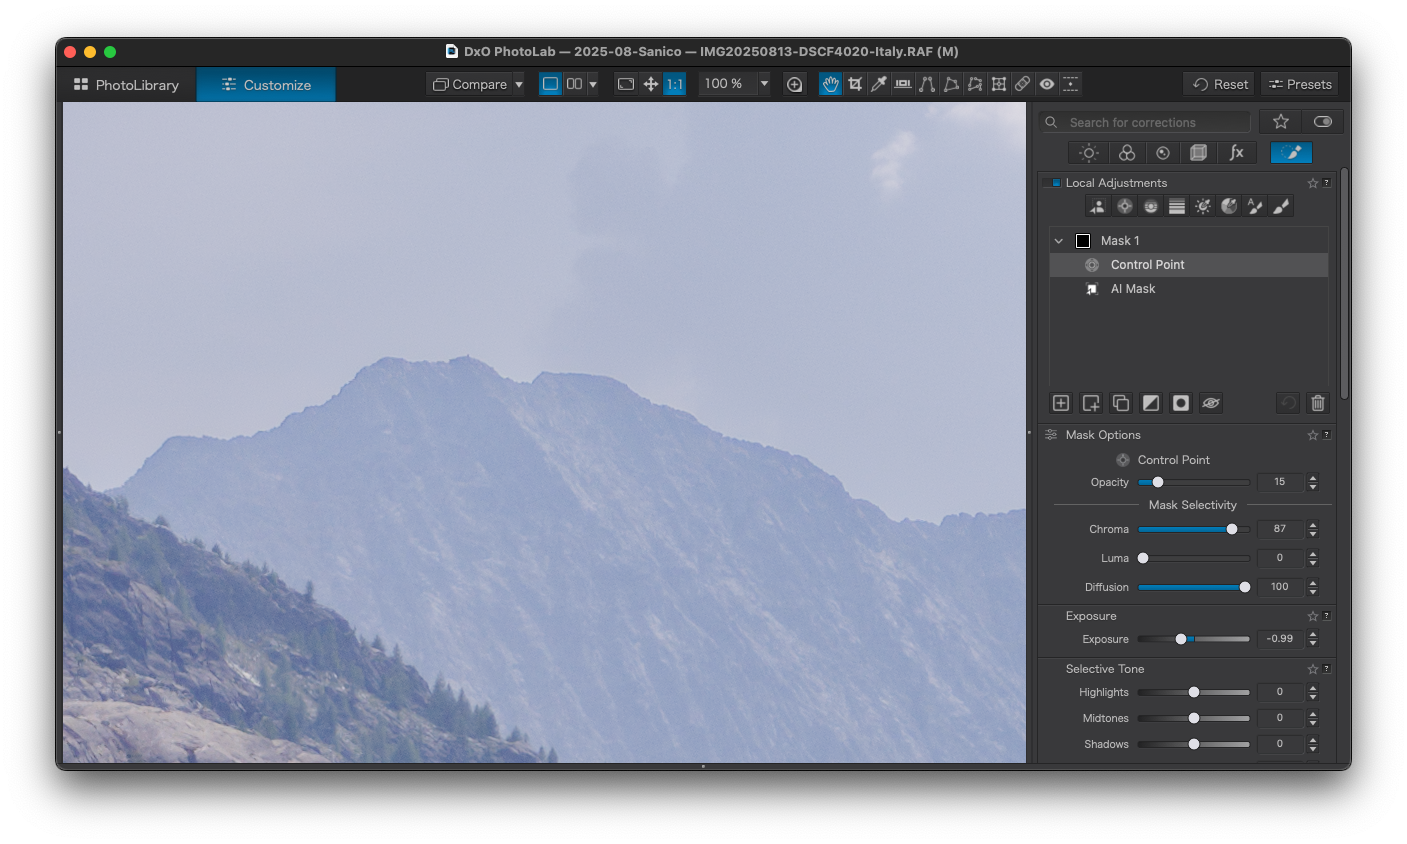
Lets revert that and look at how well the mask follows the tree-line area in the image:

This is a pretty good result. Let’s dial in -1 stop of exposure compensation for the sky and look at the result with a couple of 100% crops:


Here I think that the tools have done well on the tree-line area on the right, but much less well with the distant mountain on the left, where a clear outlining has been left.
To fix the outlining I tried a couple of options. Trying to select the distant mountain as an object itself was next to impossible, with the feathering causing visible spill in to adjacent areas:


I also tried a technique described on DxO’s help pages (search for ‘Intersection Method’), without much success.
More useful was extending the AI mask with some control points that apply the sky darkening to the problematic mountains. The outlining is still visible, but much less noticeable:

One neat feature of the new mask system is the way that the masks can be combined. The control points here their usual opacity and hue/chroma sensitivity settings, but the resulting mask areas can also be inverted or subtracted from another mask (inversion seems to be performed by the confusingly named ‘Invert Shape’ pop-up option when right-clicking on a mask).
For comparison, here is the same image using just a single linear U-point control line to darken the sky, with default chroma and luma sensitivities, and no AI:
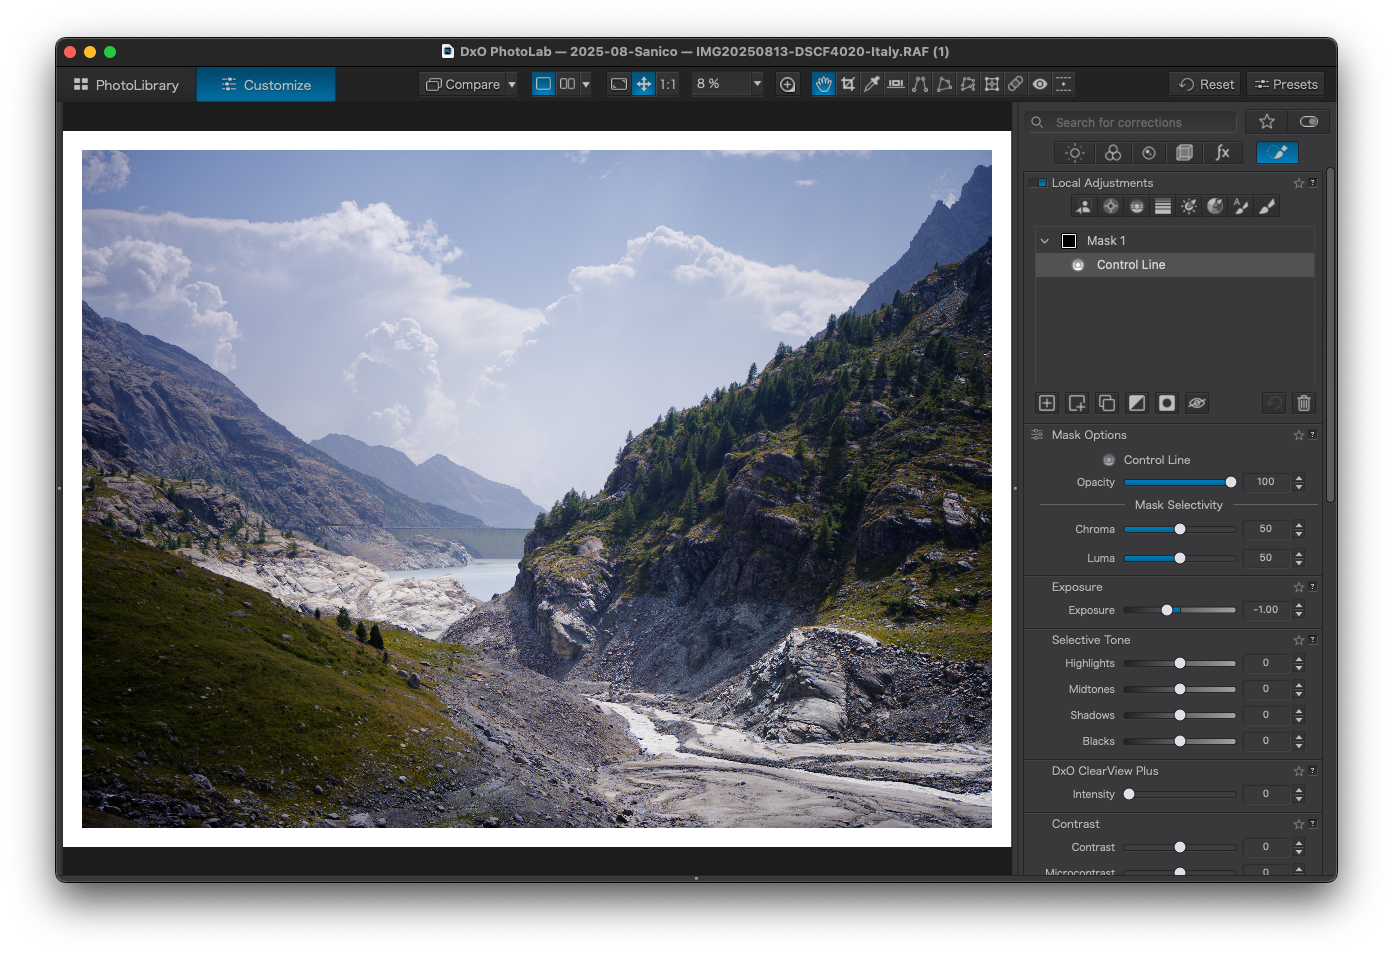


While this is also not perfect, it is a lot closer to a final image with less work.
AI Masking Example 3
A potential issue with the AI masking is the automatic feathering.
In this example, the intent was to use the AI to select one of the sharply outlined skiers. But while the UI initially shows a sharp selection outline, the resulting mask spills over to the surrounding area:

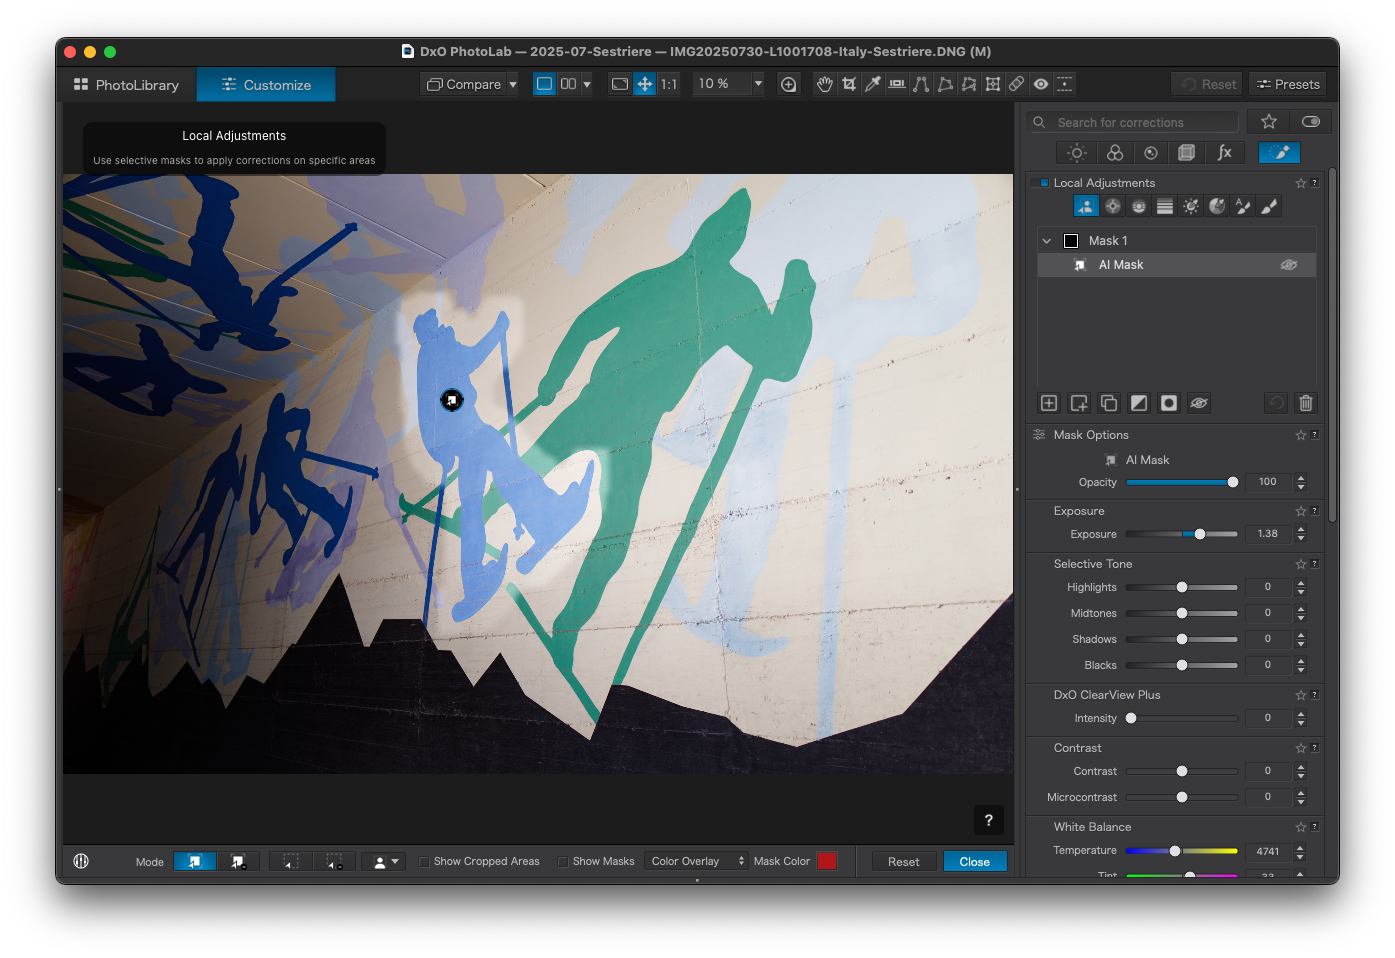
Unfortunately there is no manual control for the AI mask feathering. But Control Points now have something analogous (‘Diffusion’), so maybe this will appear in a future software version.
One thing that I tried was adding a copy of the original mask, inverting it, then setting it to be subtracted. But this only partly removes the feathering, indicating that the feathered area is not correctly inverted:

A similar test with a control point showed exact cancellation of the mask and its inverse.
Adding the equivalent of chroma/luma sensitivity to the AI masks might be useful here, although it is possible to achieve the same effect by combining the AI mask with a control point:

Here the AI mask (actually three masks, since the initial AI selection missed parts of the skis) is paired with a single huge control point with chroma sensitivity set to the skier. This last mask is then inverted and set to subtract, removing the AI feathering (‘Invert Shape’, which still no makes no sense to me as a name).
All of which seems very complicated for something that – in this case – could have been done with a few clicks of the Control Point tool with no AI at all. But it does show how flexible the new masking scheme is.
Favourites
There is now a new ‘Favourites’ implementation in the library tab, replacing the previous implementation. The older version simply replicated the macOS Finder favourites, which are typically visible on the left sidebar of Finder windows. The new version is independent of this and allows you to add arbitrary folders.
The Favourites implementation currently lacks any means to reorganise images, and cannot rename folders or move an image from one folder to another. The previous functionality for this remains, but confusingly only if you working in the ‘Folders’ tab, not the Favourites.
I cannot decide if this is an advantage or an annoyance, but it is certainly unintuitive.
Projects
There is now a ‘Projects’ palette that can be used in the Customize tab. This shows the list of projects and project groups and you can switch between them without needing to jump back to the Library tab. You can also drag-and-drop images from the film strip to add them to a different project.
This is a simple and very effective addition that makes working with collections of images faster and easier.
While there are no standard keyboard shortcuts to navigate the projects, you can use macOS system settings to add a key-binding for the menu command to add an image to a selected project. This comes close to replicating the ‘Selects’ album functionality in Capture One or ‘Quick Collection’ in Lightroom.
Image Renaming
Renaming is now much more flexible and can use tokens that insert fields from the image metadata and sequence numbers. The interface is excellent (similar to the equivalent function in Capture One) and you can save the pattern as a preset.
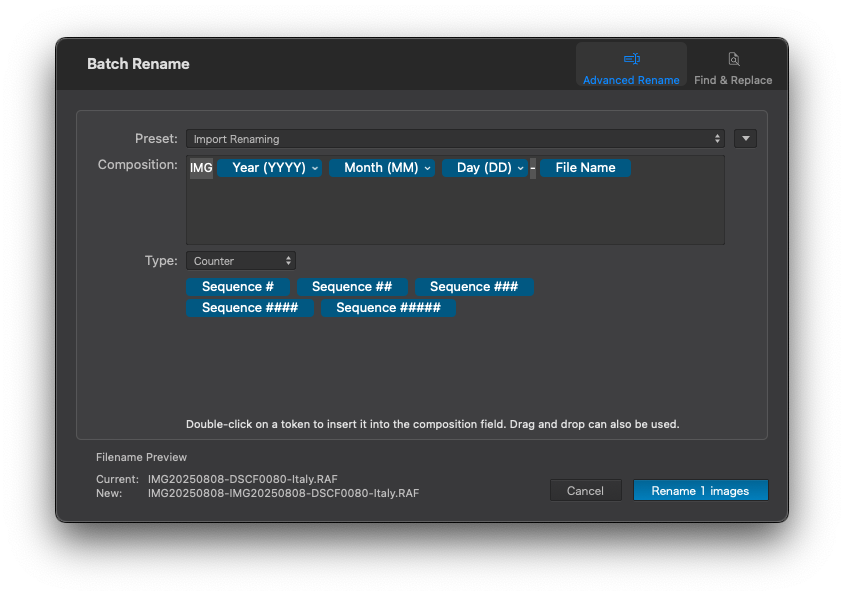
This is extremely useful. I usually rename images to include a prefix with the date, to simplify sorting. Previously I had to use FastRawViewer for that, but now it is possible directly inside of PhotoLab, where it will not break the search results.
Image Stacking
There is a new option to stack images in the Film Strip view. Doing so hides all except the first image in the stack, and any edits will only affect the first image. There are options to reorder the images in various ways
This may be helpful if you have a number of related images, from which you only really need one but just want to hide the others, rather than delete them.
Support for Apple Pro-RAW and HEIF/HEIC Files
Someone will find this useful.
But since DxO support JPEG files, why not allow the use of macOS to demosaic RAW files that are not officially supported? At present, I have 10000 such files from two different cameras which generate the following, despite full support in the OS:

As it stands, I have to maintain two different RAW processors if I want to keep using DxO.
Higher Quality Previews
Hidden away in the preferences are two new options: “Enable High Quality Previews” and “Enable Deep Prime Rendering”.
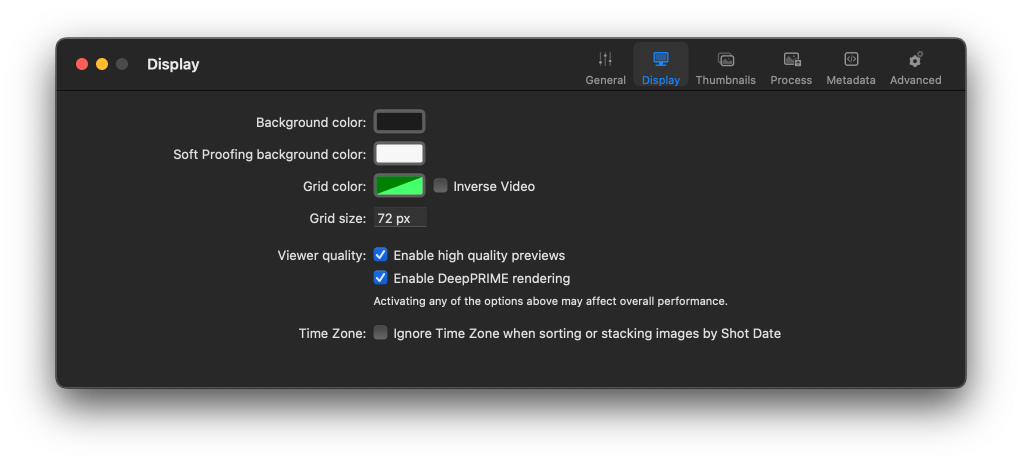
These mean that the preview display will now render in more detail and in with less noise – both frequently requested changes.
Enabling these will need a fast computer. My 3 year old M1 MacBookPro with 100MP GFX100s RAW files needs about 3 seconds to render the preview, vs much less than a second with the high quality options disabled. While this is slow, it does not really affect usage because an image is displayed immediately on switching photographs – it just takes a couple of seconds before it snaps to the highest quality.
Bugs?
The ‘Reset’ button at the top-left of the Customize tab seems to remain stubbornly disabled even with quite substantial image edits. Fortunately, the equivalent menu command and keyboard shortcut (CMD-Shift-R) work.
Add an AI mask, subtract an area from it, then hit undo. The red highlight showing the masked area is not updated until some other edit forces a screen redraw.
Also, while experimenting with the masking I had several interface issues, where the incorrect mask options would be shown. When trying to edit control points I also found they would remain stubbornly invisible, making editing difficult. These were intermittent and difficult to reproduce.
Things that Remain Unfixed But Which Really Should Be Addressed
Everyone will have their own personal pet list of changes that they would have liked to have seen. Here I list two, undo and search, if only because today no one should have to ask if these work usefully.
Undo is broken because it works only with some image edits, not all. Image rotation, metadata (keyword!) changes, or anything done in the Customize tab is ignored. And the undo history is lost the moment that the image selection is changed. Quite how a major piece of modern software can remain broken in this way in 2025 is beyond me.
Search is woefully inadequate if you have more than a handful of images. The interface is quite crude (see Capture One for an excellent search dialogue) and the results will degrade if you need to modify the folder structure using the Finder.
Here is an example search result from my image archive:

Each image is returned twice, once with a broken link and once with the actual photograph. This is the result of moving the folder containing the images with the Finder – something that is not possible within PhotoLab on macOS.
As far as I can tell, the only solution to the phantom results is to delete the DxO database entirely. This has the side effect of irretrievably loosing any projects that had been created.
Conclusion
Clearly DxO have put in a lot of work for PhotoLab 9.
When the AI works as needed, it is fast and simple. And if you want to use non-AI masking you still have the benefit of the ability to combine and subtract masks of different types.
It is also good to see some (small) improvements in the DAM features. While none of these solve my main pain-points (broken search, inability to manually reorder images in a project, lack of any equivalent to a .dop file for projects), they raise hope that maybe this is an area that will improve in future.
There are also clearly some rough edges, notably with UI glitches that again suggest a lack of rigorous testing, and also with some odd UI choices that feel a little unpolished. But none of these, so far, are show-stopping, and from past experience I expect that these will be resolved rapidly.
Overall this feels like an excellent update, even if you temper the AI hype with AI realism.
Categories: Photography, Reviews

1 Comment »